Node Wizard & Client Setup
Node Client is a lightweight control plane interface for managing VM hosts directly. For a VM host to be managed by Node Client, Node Wizard need to be installed on the host.
In this document, we are going to show how to set up Node Wizard and Node Client CLI on the same host. Note that Node Wizard and Node Client do not need to be installed on the same host.
The basic steps are
- Install Node Wizard on a VM host with Ubuntu 22.04
- Install Node Client on the same host
- Register the VM host with Node Client then request a license
- Set the license file to use
Prepare VM Host for Node Wizard
Before installing Node Wizard, we need a bridge and network configuration information for VMs.
-
Network Bridge :
List available network bridges on the host by running the command below.$ ip link show type bridgeIf a bridge with Internet connection already exists, it can be used and will be automatically detected during Node Wizard installation from version 0.5.0. If such a bridge does not exist, please create one. The below figure shows the structural change to netplan file for bridge creation.
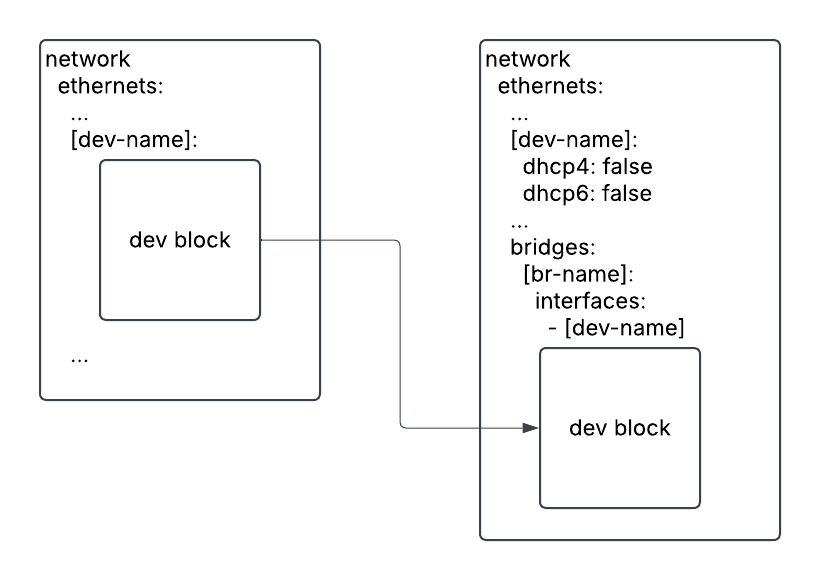
Please see Network Bridge using Netplan (Ubuntu) for detailed description.
To apply a new netplan file,$ sudo netplan generate # check validity of netplan configuration
$ sudo netplan apply
$ ip -4 -br a show # Verify the newly created bridgeYou may find tutorials in Tutorials for Network Bridge for other OSes.
-
Network Configuration Information for VMs - gateway and name servers :
These will be automatically detected during Node Wizard istallation from version 0.5.0.# Gateway IP address
$ ip route show | grep default | head -1 | cut -d" " -f3
# Nameserver IP addresses
$ resolvectl status | grep "Current DNS" | head -1 | cut -d " " -f4 -
Install jq package :
$ sudo apt install jq
Install Node Wizard
- Download an auto deployment script on the host.
$ wget https://raw.githubusercontent.com/corespeq-cw/deployments/refs/heads/main/scripts/auto_deploy_software.sh
-
Install Node Wizard systemd service by running the downloaded script,
auto_deploy_software.sh. It will detect the Host OS, download and intall Node Wizard accordingly.First, it will prompt to confirm before proceeding and then ask to accept the license agreement. Next, select the network configurations - gateway ip address, name servers (DNS) and network bridge from the detected list. We will not use Ceph RBD pool here. Then the installation of Node Wizard will proceed.
$ bash auto_deploy_software.sh node-wizard 0.5.1
You are going to download node-wizard 0.5.1 for ubuntu22
Do you want to continue? (y/n)
y
Confirmed, continuing...


This Software License Agreement, including the Order Form which by this reference is incorporated herein (this "**Agreement**"), is a binding agreement between CORESPEQ Inc. ("**Licensor**") and the person or entity identified on the Order Form as the licensee of the Software ("**Licensee**").
...
...
Do you accept the license? (y/n)
y
Confirmed, continuing...

...
Select a gateway for configuring vm's network:
1) 192.168.128.100
2) Custom
#? 1
Chosen gateway: 192.168.128.100

Select one or more nameservers (separate choices with space or comma) for configuring vm's network:
  1) 192.168.128.200
  2) Custom
Enter choice(s): 1
Chosen nameservers: 192.168.128.200

Select a libvirt pool for ceph rbd (if doesn't exist, choose custom and empty):
1) cluster-wizard
2) config
3) images
4) iso
5) Custom
#? 5
Enter custom pool:
Chosen pool:
Please create ceph_libvirt pool

Select a bridge for vmcreate:
1) br0External (Recommended)
2) docker0
3) Custom
#? 1
Chosen bridge: br0External

Setting env_node.json
{
    "pool"        : "ceph_libvirt",
    "gateway"     : "192.168.128.100",
    "nameservers" : "192.168.128.200",
    "bridge"      : "br0External"
}
Retrieving all needed dependencies
Update package list

Installing version -  0.5.1
Deploy node-wizard to install directory
Skip downloading srvany
node-wizard version 0.5.1 deployed successfully to /root/bin/node_wizard.
 - To register server or add host, use this token : Iccuebc2HFwq
 - It can be retrieved using 'sudo /root/bin/node_wizard/node-wizard --token'
Check KVM support
INFO: /dev/kvm exists
KVM acceleration can be used
A token will be printed after installation and be used for registering the host to Node Client later.
- Finally, we verify deployment by checking the Node Wizard status. It should be in a running state.
$ sudo systemctl status node-wizard.service
Install Node Client
Now, we will install Node Client CLI on the same host.
- Download an auto deployment script on the host. Here, we can skip this because the script is already downloaded on the host for Node Wizard installation.
$ wget https://raw.githubusercontent.com/corespeq-cw/deployments/refs/heads/main/scripts/auto_deploy_software.sh
- Install Node Client CLI by running the downloaded script,
auto_deploy_software.sh. It will detect the Host OS, download and intall Node Client accordingly.
$ bash auto_deploy_software.sh node-client 0.5.1
You are going to download node-client 0.5.1 for ubuntu22
Do you want to continue? (y/n)
y
Confirmed, continuing...

...

Do you accept the license? (y/n)
y
Confirmed, continuing...


Skip version checking
Retrieving all needed dependencies
Update package list
node-client installation ...
You will need to 'source /usr/share/bash-completion/completions/node-client' on your opened terminal or logout/login
- Finally, we verify deployment by checking the version of Node Client.
$ node-client --version
0.5.1
To use auto-completion feature :
$ source /usr/share/bash-completion/completions/node-client
Register the VM host and Obtain a license
-
We will register
localhost. First, get the token value from the host using the command below or use the printed token from the Node Wizard installation.$ sudo /root/bin/node_wizard/node-wizard --tokenThen, use this token to register the host with Node Client.
list-serverwill print the registered hosts, includinglocalhost.$ node-client -c register-server -S localhost -token [token]
$ node-client -c list-server -
Next, we will request a free 7-day trial license through Node Client.
$ node-client -c request-license
-
After requesting a license, we will receive an email with a license file attached. We download the license file and set it for the server.
$ node-client -c set-license -f license.txt -
Finally, we are ready to manage VMs on this host. You may find a walk-through in Node Client CLI Usage - How to create a VM for VM creation.